Fuzzing in the Large#
In the past chapters, we have always looked at fuzzing taking place on one machine for a few seconds only. In the real world, however, fuzzers are run on dozens or even thousands of machines; for hours, days and weeks; for one program or dozens of programs. In such contexts, one needs an infrastructure to collect failure data from the individual fuzzer runs, and to aggregate such data in a central repository. In this chapter, we will examine such an infrastructure, the FuzzManager framework from Mozilla.
Prerequisites
This chapter requires basic knowledge on testing, e.g. from the Introduction to testing.
This chapter requires basic knowledge on how fuzzers fork, e.g. from the Introduction to fuzzing.
import bookutils.setup
import Fuzzer
Synopsis#
To use the code provided in this chapter, write
>>> from fuzzingbook.FuzzingInTheLarge import <identifier>
and then make use of the following features.
The Python FuzzManager package allows for programmatic submission of failures from a large number of (fuzzed) programs. One can query crashes and their details, collect them into buckets to ensure they will be treated the same, and also retrieve coverage information for debugging both programs and their tests.
Collecting Crashes from Multiple Fuzzers#
So far, all our fuzzing scenarios have been one fuzzer on one machine testing one program. Failures would be shown immediately, and diagnosed quickly by the same person who started the fuzzer. Alas, testing in the real world is different. Fuzzing is still fully automated; but now, we are talking about multiple fuzzers running on multiple machines testing multiple programs (and versions thereof), producing multiple failures that have to be handled by multiple people. This raises the question of how to manage all these activities and their interplay.
A common means to coordinate several fuzzers is to have a central repository that collects all crashes as well as their crash information. Whenever a fuzzer detects a failure, it connects via the network to a crash server, which then stores the crash information in a database.
# ignore
from graphviz import Digraph
# ignore
g = Digraph()
server = 'Crash Server'
g.node('Crash Database', shape='cylinder')
for i in range(1, 7):
    g.edge('Fuzzer ' + repr(i), server)
g.edge(server, 'Crash Database')
g
The resulting crash database can be queried to find out which failures have occurred – typically, using a Web interface. It can also be integrated with other process activities. Most importantly, entries in the crash database can be linked to the bug database, and vice versa, such that bugs (= crashes) can be assigned to individual developers.
In such an infrastructure, collecting crashes is not limited to fuzzers. Crashes and failures occurring in the wild can also be automatically reported to the crash server. In industry, it is not uncommon to have crash databases collecting thousands of crashes from production runs – especially if the software in question is used by millions of people every day.
What information is stored in such a database?
Most important is the identifier of the product – that is, the product name, version information as well as the platform and the operating system. Without this information, there is no way developers can tell whether the bug is still around in the latest version, or whether it already has been fixed.
For debugging, the most helpful information for developers are the steps to reproduce – in a fuzzing scenario, this would be the input to the program in question. (In a production scenario, the user’s input is not collected for obvious privacy reasons.)
Second most helpful for debugging is a stack trace such that developers can inspect which internal functionality was active in the moment of the failure. A coverage map also comes in handy, since developers can query which functions were executed and which were not.
If general failures are collected, developers also need to know what the expected behavior was; for crashes, this is simple, as users do not expect their software to crash.
All of this information can be collected automatically if the fuzzer (or the program in question) is set up accordingly.
In this chapter, we will explore a platform that automates all these steps. The FuzzManager platform allows to
collect failure data from failing runs,
enter this data into a centralized server, and
query the server via a Web interface.
In this chapter, we will show how to conduct basic steps with FuzzManager, including crash submission and triage as well as coverage measurement tasks.
Running a Crash Server#
FuzzManager is a tool chain for managing large-scale fuzzing processes. It is modular in the sense that you can make use of those parts you need; it is versatile in the sense that it does not impose a particular process. It consists of a server whose task is to collect crash data, as well as of various collector utilities that collect crash data to send it to the server.
Excursion: Setting up the Server#
To run the examples in this notebook, we need to run a crash server – that is, the FuzzManager server. You can either
Run your own server. To do so, you need to follow the installation steps listed under “Server Setup” on the FuzzManager page. The
FuzzManagerfolder should be created in the same folder as this notebook.Have the notebook start (and stop) a server. The following commands following commands do this automatically. They are meant for the purposes of this notebook only, though; if you want to experiment with your own server, run it manually, as described above.
import os
import sys
import shutil
# ignore
if 'CI' in os.environ:
    # Can't run this in our continuous environment,
    # since it can't run a headless Web browser
    sys.exit(0)
We start with getting the fresh server code from the repository.
if os.path.exists('FuzzManager'):
    shutil.rmtree('FuzzManager')
The base repository is https://github.com/MozillaSecurity/FuzzManager, but we use the uds-se repository as this repository has the 0.4.1 stable release of FuzzManager.
!git clone https://github.com/uds-se/FuzzManager
Cloning into 'FuzzManager'...
remote: Enumerating objects: 11755, done.
remote: Counting objects: 100% (11755/11755), done.
remote: Compressing objects: 100% (3726/3726), done.
remote: Total 11755 (delta 7943), reused 11674 (delta 7862), pack-reused 0 (from 0)
Receiving objects: 100% (11755/11755), 5.33 MiB | 9.57 MiB/s, done.
Resolving deltas: 100% (7943/7943), done.
# ignore
!{sys.executable} -m pip install -r FuzzManager/server/requirements.txt > /dev/null
WARNING: Ignoring version 4.2.2 of celery since it has invalid metadata:
Requested celery<4.3,>=4.1.1 from https://files.pythonhosted.org/packages/24/e9/9741a5a8b83253e27293e77bd4319c84306019dfbfa4cc43fa250243c12f/celery-4.2.2-py2.py3-none-any.whl (from -r FuzzManager/server/requirements.txt (line 9)) has invalid metadata: Expected matching RIGHT_PARENTHESIS for LEFT_PARENTHESIS, after version specifier
    pytz (>dev)
         ~^
Please use pip<24.1 if you need to use this version.
WARNING: Ignoring version 4.2.1 of celery since it has invalid metadata:
Requested celery<4.3,>=4.1.1 from https://files.pythonhosted.org/packages/e8/58/2a0b1067ab2c12131b5c089dfc579467c76402475c5231095e36a43b749c/celery-4.2.1-py2.py3-none-any.whl (from -r FuzzManager/server/requirements.txt (line 9)) has invalid metadata: Expected matching RIGHT_PARENTHESIS for LEFT_PARENTHESIS, after version specifier
    pytz (>dev)
         ~^
Please use pip<24.1 if you need to use this version.
WARNING: Ignoring version 4.2.0 of celery since it has invalid metadata:
Requested celery<4.3,>=4.1.1 from https://files.pythonhosted.org/packages/ea/75/d7d1eaeb6c90c7442f7b96242a6d4ebcf1cf075f9c51957d061fb8264d24/celery-4.2.0-py2.py3-none-any.whl (from -r FuzzManager/server/requirements.txt (line 9)) has invalid metadata: Expected matching RIGHT_PARENTHESIS for LEFT_PARENTHESIS, after version specifier
    pytz (>dev)
         ~^
Please use pip<24.1 if you need to use this version.
WARNING: Ignoring version 4.1.1 of celery since it has invalid metadata:
Requested celery<4.3,>=4.1.1 from https://files.pythonhosted.org/packages/99/fa/4049b26bfe71992ecf979acd39b87e55b493608613054089d975418015b7/celery-4.1.1-py2.py3-none-any.whl (from -r FuzzManager/server/requirements.txt (line 9)) has invalid metadata: Expected matching RIGHT_PARENTHESIS for LEFT_PARENTHESIS, after version specifier
    pytz (>dev)
         ~^
Please use pip<24.1 if you need to use this version.
ERROR: Ignored the following yanked versions: 5.0.6, 5.2.5
ERROR: Could not find a version that satisfies the requirement celery<4.3,>=4.1.1 (from versions: 0.1.2, 0.1.4, 0.1.6, 0.1.7, 0.1.8, 0.1.10, 0.1.11, 0.1.12, 0.1.13, 0.1.14, 0.1.15, 0.2.0, 0.3.0, 0.3.7, 0.3.20, 0.4.0, 0.4.1, 0.6.0, 0.8.0, 0.8.1, 0.8.2, 0.8.3, 0.8.4, 1.0.0, 1.0.1, 1.0.2, 1.0.3, 1.0.4, 1.0.5, 1.0.6, 2.0.0, 2.0.1, 2.0.2, 2.0.3, 2.1.0, 2.1.1, 2.1.2, 2.1.3, 2.1.4, 2.2.0, 2.2.1, 2.2.2, 2.2.3, 2.2.4, 2.2.5, 2.2.6, 2.2.7, 2.2.8, 2.2.9, 2.2.10, 2.3.0, 2.3.1, 2.3.2, 2.3.3, 2.3.4, 2.3.5, 2.4.0, 2.4.1, 2.4.2, 2.4.3, 2.4.4, 2.4.5, 2.4.6, 2.4.7, 2.5.0, 2.5.1, 2.5.2, 2.5.3, 2.5.5, 3.0.0, 3.0.1, 3.0.2, 3.0.3, 3.0.4, 3.0.5, 3.0.6, 3.0.7, 3.0.8, 3.0.9, 3.0.10, 3.0.11, 3.0.12, 3.0.13, 3.0.14, 3.0.15, 3.0.16, 3.0.17, 3.0.18, 3.0.19, 3.0.20, 3.0.21, 3.0.22, 3.0.23, 3.0.24, 3.0.25, 3.1.0, 3.1.1, 3.1.2, 3.1.3, 3.1.4, 3.1.5, 3.1.6, 3.1.7, 3.1.8, 3.1.9, 3.1.10, 3.1.11, 3.1.12, 3.1.13, 3.1.14, 3.1.15, 3.1.16, 3.1.17, 3.1.18, 3.1.19, 3.1.20, 3.1.21, 3.1.22, 3.1.23, 3.1.24, 3.1.25, 3.1.26.post1, 3.1.26.post2, 4.0.0rc3, 4.0.0rc4, 4.0.0rc5, 4.0.0rc6, 4.0.0rc7, 4.0.0, 4.0.1, 4.0.2, 4.1.0, 4.1.1, 4.2.0rc1, 4.2.0rc2, 4.2.0rc3, 4.2.0rc4, 4.2.0, 4.2.1, 4.2.2, 4.3.0rc1, 4.3.0rc2, 4.3.0rc3, 4.3.0, 4.3.1, 4.4.0rc1, 4.4.0rc2, 4.4.0rc3, 4.4.0rc4, 4.4.0rc5, 4.4.0, 4.4.1, 4.4.2, 4.4.3, 4.4.4, 4.4.5, 4.4.6, 4.4.7, 5.0.0a1, 5.0.0a2, 5.0.0b1, 5.0.0rc1, 5.0.0rc2, 5.0.0rc3, 5.0.0, 5.0.1, 5.0.2, 5.0.3, 5.0.4, 5.0.5, 5.1.0b1, 5.1.0b2, 5.1.0rc1, 5.1.0, 5.1.1, 5.1.2, 5.2.0b1, 5.2.0b2, 5.2.0b3, 5.2.0rc1, 5.2.0rc2, 5.2.0, 5.2.1, 5.2.2, 5.2.3, 5.2.4, 5.2.6, 5.2.7, 5.3.0a1, 5.3.0b1, 5.3.0b2, 5.3.0rc1, 5.3.0rc2, 5.3.0, 5.3.1, 5.3.4, 5.3.5, 5.3.6, 5.4.0rc1, 5.4.0rc2, 5.4.0, 5.5.0b1, 5.5.0b2, 5.5.0b3, 5.5.0b4, 5.5.0rc1)
ERROR: No matching distribution found for celery<4.3,>=4.1.1
# ignore
# To make FuzzManager 0.4.1 work on Python 3.10, we need to upgrade the `celery` package
!{sys.executable} -m pip install --upgrade celery > /dev/null 2>&1
!cd FuzzManager; {sys.executable} server/manage.py migrate > /dev/null
We create a user named demo with a password demo, using this handy trick.
!(cd FuzzManager; echo "from django.contrib.auth import get_user_model; User = get_user_model(); User.objects.create_superuser('demo', 'demo@fuzzingbook.org', 'demo')" | {sys.executable} server/manage.py shell)
We create a token for this user. This token will later be used by automatic commands for authentication.
import subprocess
import sys
os.chdir('FuzzManager')
result = subprocess.run(['python',
                         'server/manage.py',
                         'get_auth_token',
                         'demo'],
                        stdout=subprocess.PIPE,
                        stderr=subprocess.PIPE)
os.chdir('..')

err = result.stderr.decode('ascii')
if len(err) > 0:
    print(err, file=sys.stderr, end="")
token = result.stdout
token = token.decode('ascii').strip()
token
'5371d2409244c4a7ad22874ffab40c9c4d2b4883'
# ignore
assert len(token) > 10, "Invalid token " + repr(token)
The token is stored in ~/.fuzzmanagerconf in our home folder. This is the full configuration:
# ignore
home = os.path.expanduser("~")
conf = os.path.join(home, ".fuzzmanagerconf")
# ignore
fuzzmanagerconf = """
[Main]
sigdir = /home/example/fuzzingbook
serverhost = 127.0.0.1
serverport = 8000
serverproto = http
serverauthtoken = %s
tool = fuzzingbook
""" % token
# ignore
with open(conf, "w") as file:
    file.write(fuzzmanagerconf)
# ignore
from pygments.lexers.configs import IniLexer
# ignore
from bookutils import print_file
# ignore
print_file(conf, lexer=IniLexer())
[Main]
sigdir = /home/example/fuzzingbook
serverhost = 127.0.0.1
serverport = 8000
serverproto = http
serverauthtoken = 5371d2409244c4a7ad22874ffab40c9c4d2b4883
tool = fuzzingbook
End of Excursion#
Excursion: Starting the Server#
Once the server is set up, we can start it. On the command line, we use
$ cd FuzzManager; python server/manage.py runserver
In our notebook, we can do this programmatically, using the Process framework introduced for fuzzing Web servers. We let the FuzzManager server run in its own process, which we start in the background.
For multiprocessing, we use the multiprocess module - a variant of the standard Python multiprocessing module that also works in notebooks. If you are running this code outside a notebook, you can also use multiprocessing instead.
from multiprocess import Process # type: ignore
import subprocess
def run_fuzzmanager():
    def run_fuzzmanager_forever():
        os.chdir('FuzzManager')
        proc = subprocess.Popen(['python', 'server/manage.py',
                                 'runserver'],
                                stdout=subprocess.PIPE,
                                stdin=subprocess.PIPE,
                                stderr=subprocess.STDOUT,
                                universal_newlines=True)

        while True:
            line = proc.stdout.readline()
            print(line, end='')

    fuzzmanager_process = Process(target=run_fuzzmanager_forever)
    fuzzmanager_process.start()

    return fuzzmanager_process
While the server is running, you will be able to see its output below.
fuzzmanager_process = run_fuzzmanager()
import time
# wait a bit after interactions
DELAY_AFTER_START = 3
DELAY_AFTER_CLICK = 1.5
time.sleep(DELAY_AFTER_START)
End of Excursion#
Logging In#
Now that the server is up and running, FuzzManager can be reached on the local host using this URL.
fuzzmanager_url = "http://127.0.0.1:8000"
To log in, use the username demo and the password demo. In this notebook, we do this programmatically, using the Selenium interface introduced in the chapter on GUI fuzzing.
from IPython.display import display, Image
from bookutils import HTML, rich_output
from GUIFuzzer import start_webdriver # minor dependency
For an interactive session, set headless to False; then you can interact with FuzzManager at the same time you are interacting with this notebook.
gui_driver = start_webdriver(headless=True, zoom=1.2)
gui_driver.set_window_size(1400, 600)
gui_driver.get(fuzzmanager_url)
This is the starting screen of FuzzManager:
# ignore
Image(gui_driver.get_screenshot_as_png())

We now log in by sending demo both as username and password, and then click on the Login button.
# ignore
from selenium.webdriver.common.by import By
# ignore
username = gui_driver.find_element(By.NAME, "username")
username.send_keys("demo")
# ignore
password = gui_driver.find_element(By.NAME, "password")
password.send_keys("demo")
# ignore
login = gui_driver.find_element(By.TAG_NAME, "button")
login.click()
time.sleep(DELAY_AFTER_CLICK)
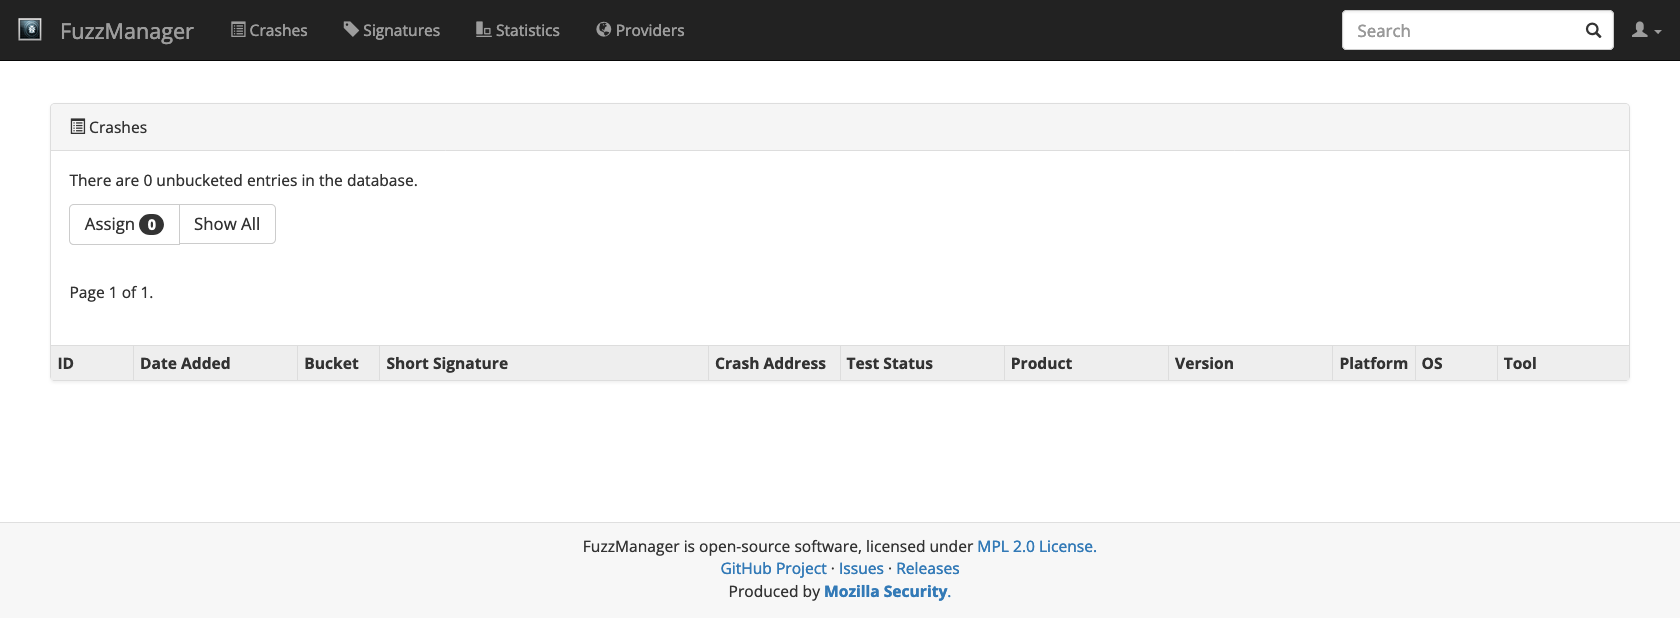
After login, we find an empty database. This is where crashes will appear, once we have collected them.
# ignore
Image(gui_driver.get_screenshot_as_png())
Collecting Crashes#
To fill our database, we need some crashes. Let us take a look at simply-buggy, an example repository containing trivial C++ programs for illustration purposes.
!git clone https://github.com/uds-se/simply-buggy
Cloning into 'simply-buggy'...
remote: Enumerating objects: 22, done.
remote: Total 22 (delta 0), reused 0 (delta 0), pack-reused 22 (from 1)
Receiving objects: 100% (22/22), 4.90 KiB | 4.90 MiB/s, done.
Resolving deltas: 100% (9/9), done.
The make command compiles our target program, including our first target, the simple-crash example. Alongside the program, there is also a configuration file generated.
!(cd simply-buggy && make)
clang++ -fsanitize=address -g -o maze maze.cpp
clang++ -fsanitize=address -g -o out-of-bounds out-of-bounds.cpp
clang++ -fsanitize=address -g -o simple-crash simple-crash.cpp
Let’s take a look at the simple-crash source code in simple-crash.cpp. As you can see, the source code is fairly simple: A forced crash by writing to a (near)-NULL pointer. This should immediately crash on most machines.
# ignore
from bookutils import print_file
# ignore
print_file("simply-buggy/simple-crash.cpp")
/*
 * simple-crash - A simple NULL crash.
 *
 * WARNING: This program neither makes sense nor should you code like it is
 *          done in this program. It is purely for demo purposes and uses
 *          bad and meaningless coding habits on purpose.
 */

int crash() {
  int* p = (int*)0x1;
  *p = 0xDEADBEEF;
  return *p;
}

int main(int argc, char** argv) {
  return crash();
}
The configuration file simple-crash.fuzzmanagerconf generated for the the binary also contains some straightforward information, like the version of the program and other metadata that is required or at least useful later on when submitting crashes.
# ignore
print_file("simply-buggy/simple-crash.fuzzmanagerconf", lexer=IniLexer())
[Main]
platform = x86-64
product = simple-crash-simple-crash
product_version = 83038f74e812529d0fc172a718946fbec385403e
os = linux

[Metadata]
pathPrefix = /Users/zeller/Projects/fuzzingbook/notebooks/simply-buggy/
buildFlags = -fsanitize=address -g
Let us run the program! We immediately get a crash trace as expected:
!simply-buggy/simple-crash
simple-crash(47892,0x1fd223840) malloc: nano zone abandoned due to inability to reserve vm space.
AddressSanitizer:DEADLYSIGNAL
=================================================================
==47892==ERROR: AddressSanitizer: SEGV on unknown address 0x000000000001 (pc 0x0001005c3e0c bp 0x00016f83ea10 sp 0x00016f83e9d0 T0)
==47892==The signal is caused by a WRITE memory access.
==47892==Hint: address points to the zero page.
    #0 0x1005c3e0c in crash() simple-crash.cpp:11
    #1 0x1005c3e94 in main simple-crash.cpp:16
    #2 0x197d8c270  (<unknown module>)

==47892==Register values:
 x[0] = 0x0000000000000001   x[1] = 0x000000016f83ec98   x[2] = 0x000000016f83eca8   x[3] = 0x000000016f83ef08
 x[4] = 0x0000000000000001   x[5] = 0x0000000000000000   x[6] = 0x0000000000000000   x[7] = 0x00000000000004a0
 x[8] = 0x0000007000020000   x[9] = 0x00000000deadbeef  x[10] = 0x0000000000000001  x[11] = 0x000000016f83e9d0
x[12] = 0x0000000000001170  x[13] = 0x0000000100008000  x[14] = 0x0000000000004000  x[15] = 0x00000001a5bcef55
x[16] = 0x0000000198141344  x[17] = 0x0000000205482578  x[18] = 0x0000000000000000  x[19] = 0x00000001fcf8c050
x[20] = 0x00000001fcf8c0a0  x[21] = 0x00000001fcf8c050  x[22] = 0x000000016f83eb28  x[23] = 0x000000016f83eb28
x[24] = 0x0000000197d86000  x[25] = 0x0000000000000000  x[26] = 0x0000000000000000  x[27] = 0x0000000000000000
x[28] = 0x0000000000000000     fp = 0x000000016f83ea10     lr = 0x00000001005c3e98     sp = 0x000000016f83e9d0
AddressSanitizer can not provide additional info.
SUMMARY: AddressSanitizer: SEGV simple-crash.cpp:11 in crash()
==47892==ABORTING
Now, what we would actually like to do is to run this binary from Python instead, detect that it crashed, collect the trace and submit it to the server. Let’s start with a simple script that would just run the program we give it and detect the presence of the ASan trace:
import subprocess
cmd = ["simply-buggy/simple-crash"]
result = subprocess.run(cmd, stderr=subprocess.PIPE)
stderr = result.stderr.decode().splitlines()
crashed = False

for line in stderr:
    if "ERROR: AddressSanitizer" in line:
        crashed = True
        break

if crashed:
    print("Yay, we crashed!")
else:
    print("Move along, nothing to see...")
Yay, we crashed!
With this script, we can now run the binary and indeed detect that it crashed. But how do we send this information to the crash server now? Let’s add a few features from the FuzzManager toolbox.
Program Configurations#
A ProgramConfiguration is largely a container class storing various properties of the program, e.g. product name, the platform, version and runtime options. By default, it reads the information from the .fuzzmanagerconf file created for the program under test.
sys.path.append('FuzzManager')
from FTB.ProgramConfiguration import ProgramConfiguration # type: ignore
configuration = ProgramConfiguration.fromBinary('simply-buggy/simple-crash')
(configuration.product, configuration.platform)
('simple-crash-simple-crash', 'x86-64')
Crash Info#
A CrashInfo object stores all the necessary data about a crash, including
the stdout output of your program
the stderr output of your program
crash information as produced by GDB or AddressSanitizer
a
ProgramConfigurationinstance
from FTB.Signatures.CrashInfo import CrashInfo # type: ignore
Let’s collect the information for the run of simply-crash:
cmd = ["simply-buggy/simple-crash"]
result = subprocess.run(cmd, stderr=subprocess.PIPE, stdout=subprocess.PIPE)
stderr = result.stderr.decode().splitlines()
stderr[0:3]
['AddressSanitizer:DEADLYSIGNAL',
 '=================================================================',
 '==47914==ERROR: AddressSanitizer: SEGV on unknown address 0x000000000001 (pc 0x000102897e0c bp 0x00016d56aab0 sp 0x00016d56aa70 T0)']
stdout = result.stdout.decode().splitlines()
stdout
[]
This reads and parses our ASan trace into a more generic format, returning us a generic CrashInfo object that we can inspect and/or submit to the server:
crashInfo = CrashInfo.fromRawCrashData(stdout, stderr, configuration)
print(crashInfo)
Crash trace:

# 00    crash
# 01    main
# 02    <unknow

Crash address: 0x1

Last 5 lines on stderr:
x[24] = 0x0000000197d86000  x[25] = 0x0000000000000000  x[26] = 0x0000000000000000  x[27] = 0x0000000000000000
x[28] = 0x0000000000000000     fp = 0x000000016d56aab0     lr = 0x0000000102897e98     sp = 0x000000016d56aa70
AddressSanitizer can not provide additional info.
SUMMARY: AddressSanitizer: SEGV simple-crash.cpp:11 in crash()
==47914==ABORTING
Collector#
The last step is to send the crash info to our crash manager. A Collector is a feature to communicate with a CrashManager server. Collector provides an easy client interface that allows your clients to submit crashes as well as download and match existing signatures to avoid reporting frequent issues repeatedly.
from Collector.Collector import Collector # type: ignore
We instantiate the collector instance; this will be our entry point for talking to the server.
collector = Collector()
To submit the crash info, we use the collector’s submit() method:
collector.submit(crashInfo)
{'rawStdout': '',
 'rawStderr': 'AddressSanitizer:DEADLYSIGNAL\n=================================================================\n==47914==ERROR: AddressSanitizer: SEGV on unknown address 0x000000000001 (pc 0x000102897e0c bp 0x00016d56aab0 sp 0x00016d56aa70 T0)\n==47914==The signal is caused by a WRITE memory access.\n==47914==Hint: address points to the zero page.\n    #0 0x102897e0c in crash() simple-crash.cpp:11\n    #1 0x102897e94 in main simple-crash.cpp:16\n    #2 0x197d8c270  (<unknown module>)\n\n==47914==Register values:\n x[0] = 0x0000000000000001   x[1] = 0x000000016d56ad30   x[2] = 0x000000016d56ad40   x[3] = 0x000000016d56af90  \n x[4] = 0x0000000000000001   x[5] = 0x0000000000000000   x[6] = 0x0000000000000000   x[7] = 0x00000000000004a0  \n x[8] = 0x0000007000020000   x[9] = 0x00000000deadbeef  x[10] = 0x0000000000000001  x[11] = 0x000000016d56aa70  \nx[12] = 0x0000000000001170  x[13] = 0x0000000100008000  x[14] = 0x0000000000004000  x[15] = 0x00000001a5bcef55  \nx[16] = 0x0000000198141344  x[17] = 0x0000000205482578  x[18] = 0x0000000000000000  x[19] = 0x00000001fcf8c050  \nx[20] = 0x00000001fcf8c0a0  x[21] = 0x00000001fcf8c050  x[22] = 0x000000016d56abc8  x[23] = 0x000000016d56abc8  \nx[24] = 0x0000000197d86000  x[25] = 0x0000000000000000  x[26] = 0x0000000000000000  x[27] = 0x0000000000000000  \nx[28] = 0x0000000000000000     fp = 0x000000016d56aab0     lr = 0x0000000102897e98     sp = 0x000000016d56aa70  \nAddressSanitizer can not provide additional info.\nSUMMARY: AddressSanitizer: SEGV simple-crash.cpp:11 in crash()\n==47914==ABORTING',
 'rawCrashData': '',
 'metadata': '{"pathPrefix": "/Users/zeller/Projects/fuzzingbook/notebooks/simply-buggy/", "buildFlags": "-fsanitize=address -g"}',
 'testcase_size': 0,
 'testcase_quality': 0,
 'testcase_isbinary': False,
 'platform': 'x86-64',
 'product': 'simple-crash-simple-crash',
 'product_version': '83038f74e812529d0fc172a718946fbec385403e',
 'os': 'linux',
 'client': 'Braeburn.fritz.box',
 'tool': 'fuzzingbook',
 'env': '',
 'args': '',
 'bucket': None,
 'id': 1,
 'shortSignature': '[@ crash]',
 'crashAddress': '0x1'}
Inspecting Crashes#
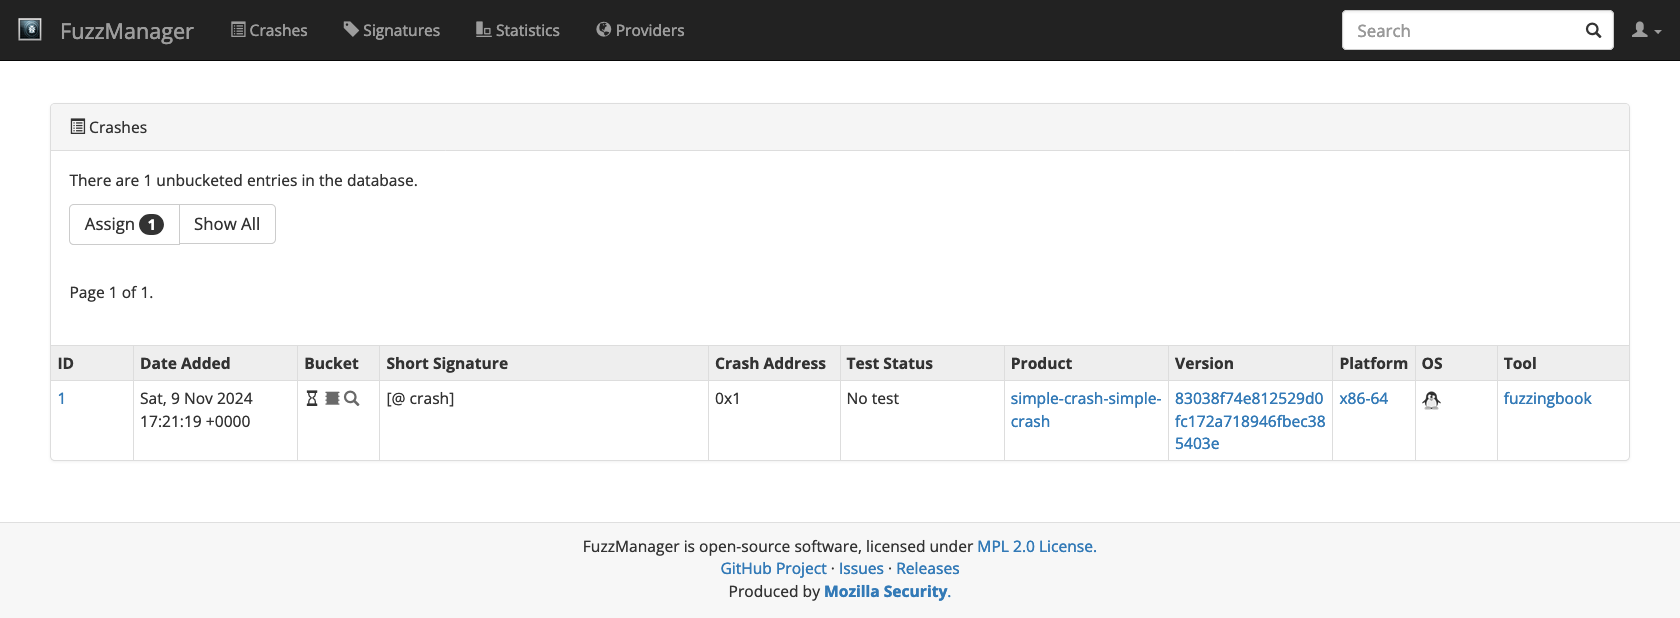
We now submitted something to our local FuzzManager demo instance. If you run the crash server on your local machine, you can go to http://127.0.0.1:8000/crashmanager/crashes/ you should see the crash info just submitted. You can inquire the product, version, operating system, and further crash details.
# ignore
gui_driver.refresh()
# ignore
Image(gui_driver.get_screenshot_as_png())
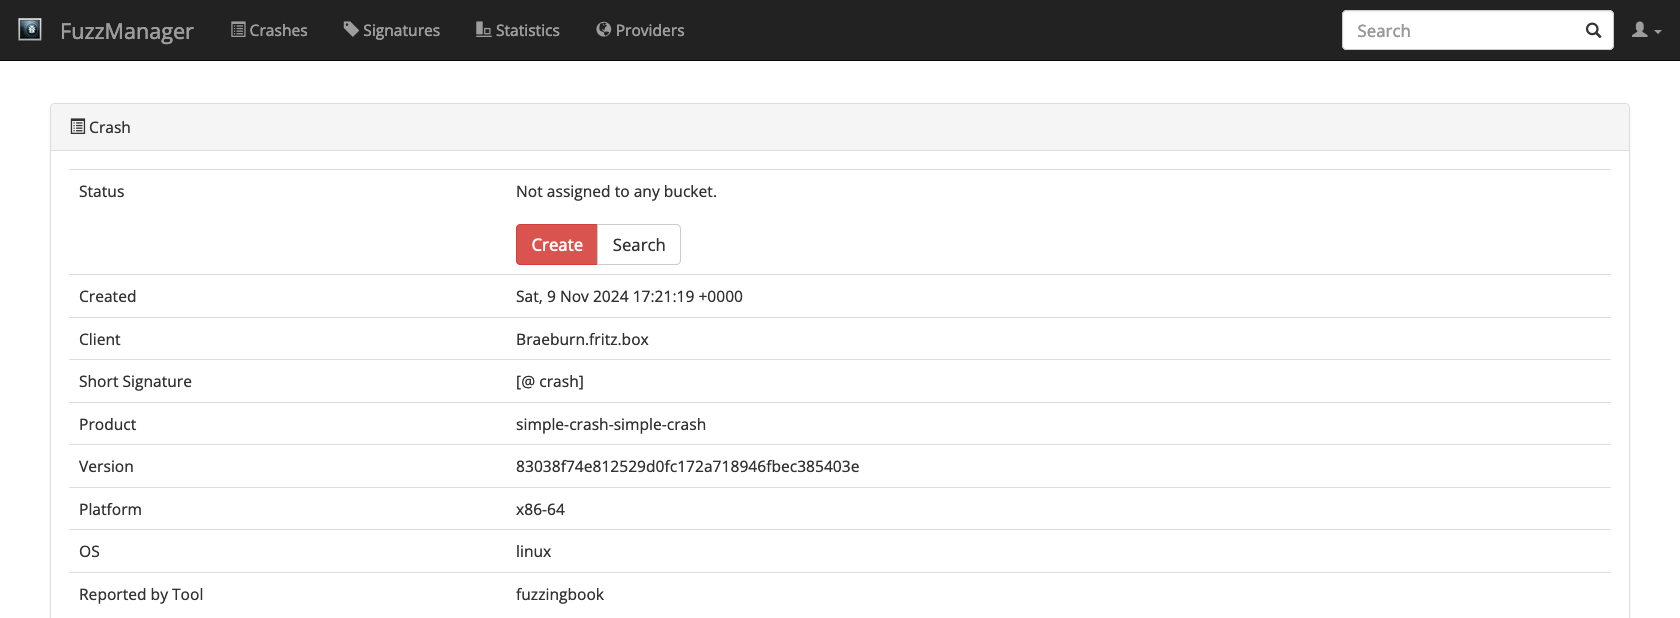
If you click on the crash ID, you can further inspect the submitted data.
# ignore
crash = gui_driver.find_element(By.XPATH, '//td/a[contains(@href,"/crashmanager/crashes/")]')
crash.click()
time.sleep(DELAY_AFTER_CLICK)
# ignore
Image(gui_driver.get_screenshot_as_png())
Since Collectors can be called from any program (provided they are configured to talk to the correct server), you can now collect crashes from anywhere – fuzzers on remote machines, crashes occurring during beta testing, or even crashes during production.
Crash Buckets#
One challenge with collecting crashes is that the same crashes occur multiple times. If a product is in the hands of millions of users, chances are that thousands of them will encounter the same bug, and thus the same crash. Therefore, the database will have thousands of entries that are all caused by the same one bug. Therefore, it is necessary to identify those failures that are similar and to group them together in a set called a crash bucket or bucket for short.
In FuzzManager, a bucket is defined through a crash signature, a list of predicates matching a set of bugs. Such a predicate can refer to a number of features, the most important being
the current program counter, reporting the instruction executed at the moment of the crash;
elements from the stack trace, showing which functions were active at the moment of the crash.
We can create such a signature right away when viewing a single crash:
# ignore
Image(gui_driver.get_screenshot_as_png())

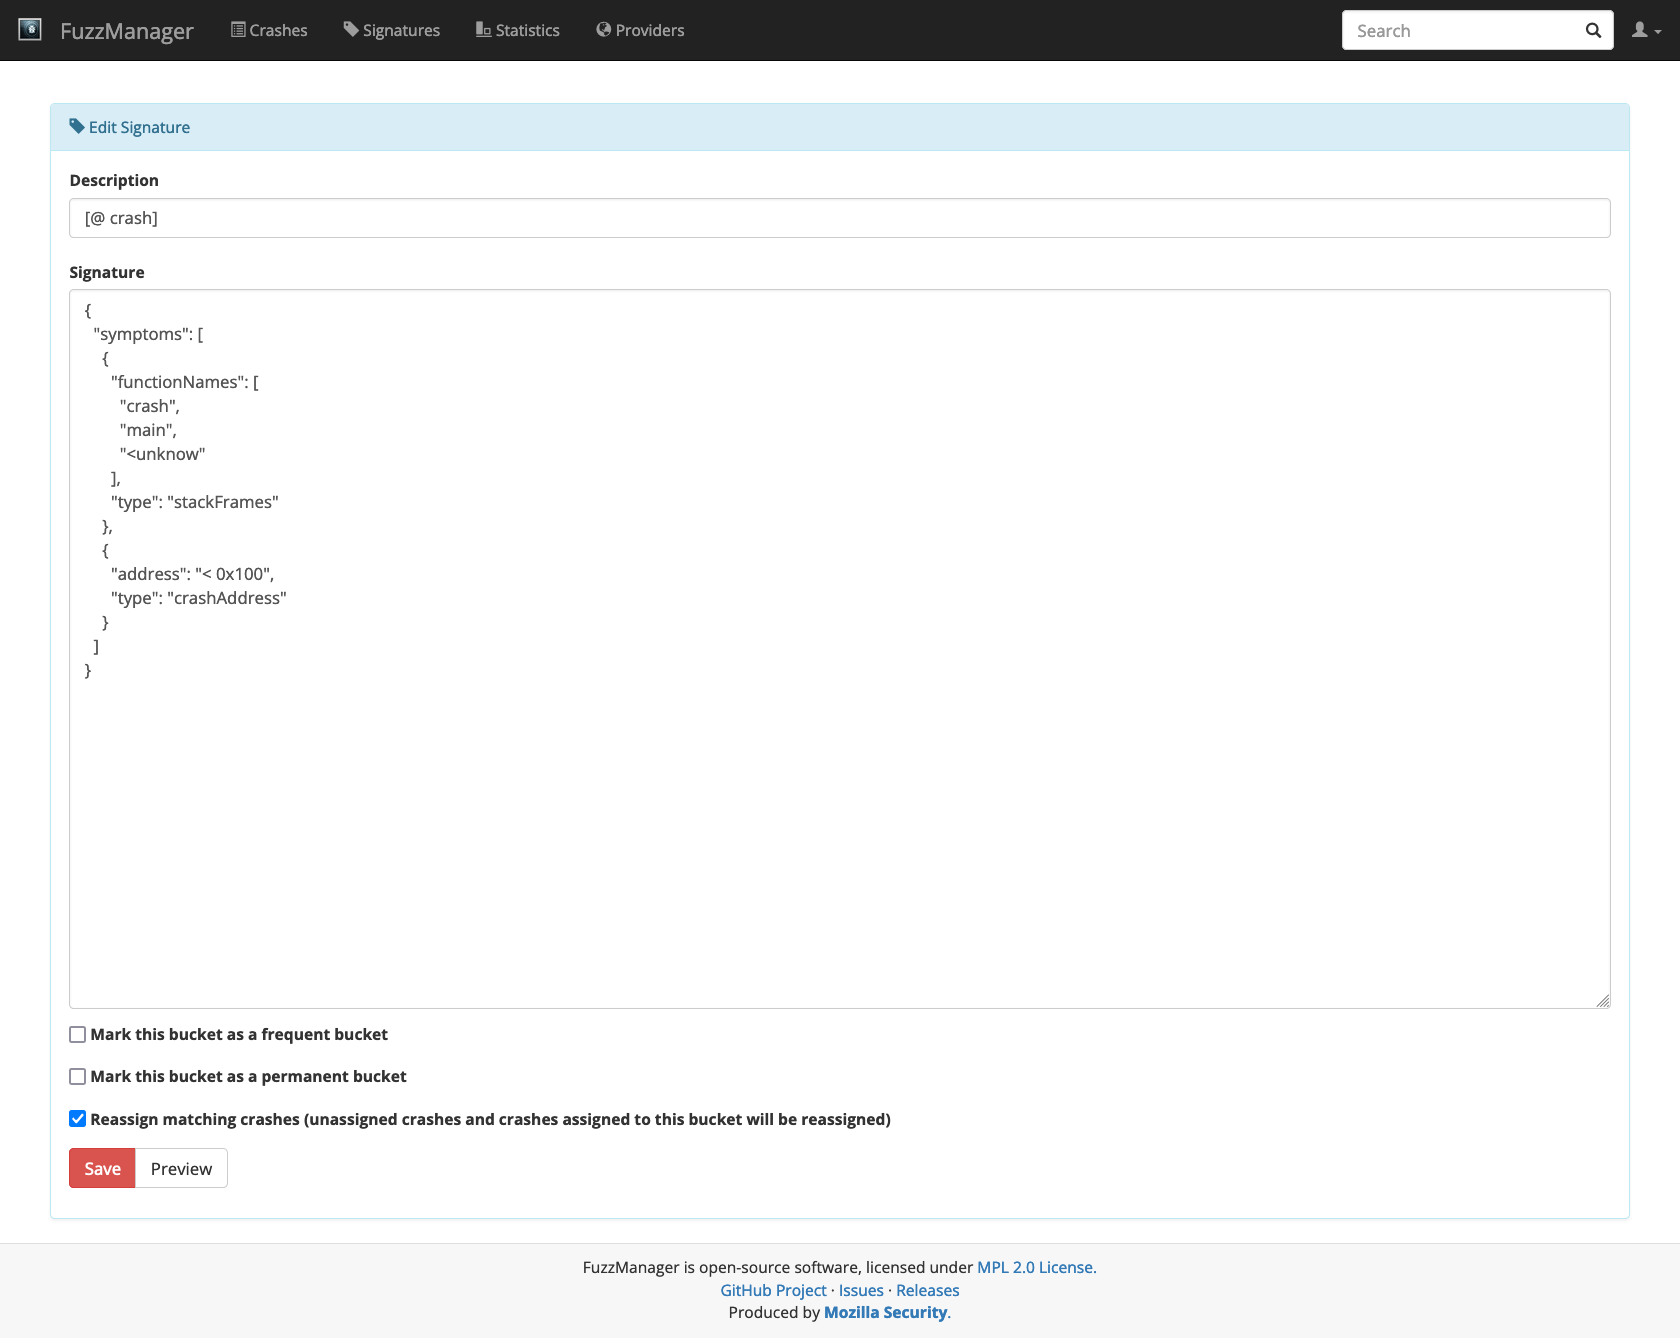
Clicking the red Create button creates a bucket for this crash. A crash signature will be proposed to you for matching this and future crashes of the same type:
# ignore
create = gui_driver.find_element(By.XPATH, '//a[contains(@href,"/signatures/new/")]')
create.click()
time.sleep(DELAY_AFTER_CLICK)
# ignore
gui_driver.set_window_size(1400, 1200)
# ignore
Image(gui_driver.get_screenshot_as_png())
Accept it by clicking Save.
# ignore
save = gui_driver.find_element(By.NAME, "submit_save")
save.click()
time.sleep(DELAY_AFTER_CLICK)
You will be redirected to the newly created bucket, which shows you the size (how many crashes it holds), its bug report status (buckets can be linked to bugs in an external bug tracker like Bugzilla) and many other useful information.
Crash Signatures#
If you click on the Signatures entry in the top menu, you should also see your newly created entry.
# ignore
gui_driver.set_window_size(1400, 800)
Image(gui_driver.get_screenshot_as_png())
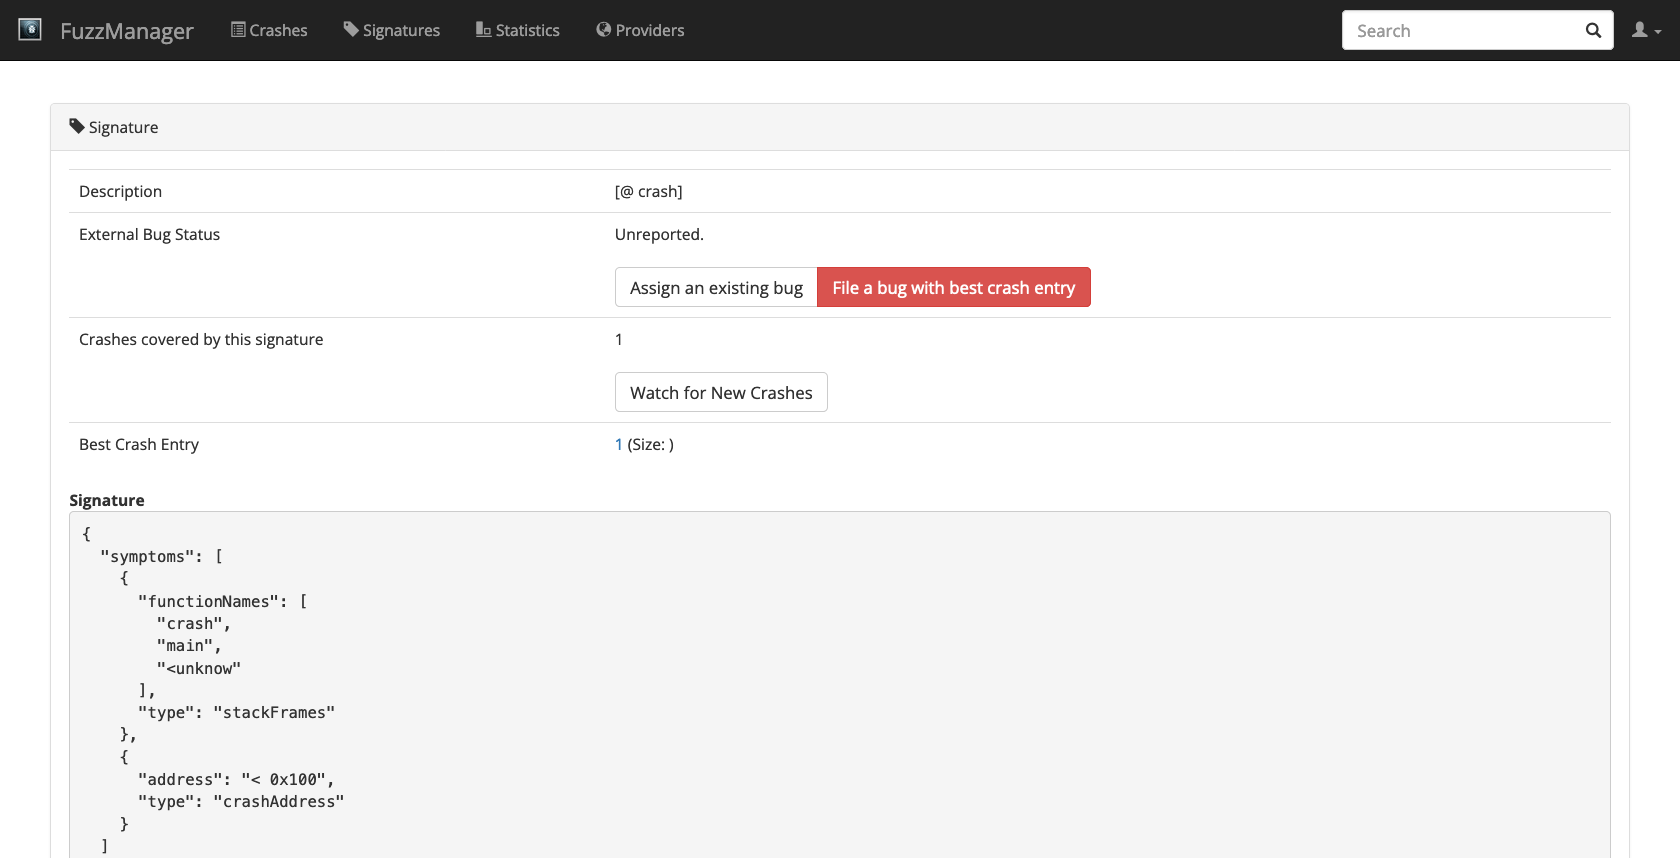
You see that this signature refers to a crash occurring in the function crash() (duh!) when called from main() when called from start() (an internal OS function). We also see the current crash address.
Buckets and their signatures are a central concept in FuzzManager. If you receive a lot of crash reports from various sources, bucketing allows you to easily group crashes and filter duplicates.
Coarse-Grained Signatures#
The flexible signature system starts out with an initially proposed fine-grained signature, but it can be adjusted as needed to capture variations of the same bug and make tracking easier.
In the next example, we will look at a more complex example that reads data from a file and creates multiple crash signatures - a file out-of-bounds.cpp:
# ignore
print_file("simply-buggy/out-of-bounds.cpp")
/*
 * out-of-bounds - A simple multi-signature out-of-bounds demo.
 *
 * WARNING: This program neither makes sense nor should you code like it is
 *          done in this program. It is purely for demo purposes and uses
 *          bad and meaningless coding habits on purpose.
 */
#include <cstring>
#include <fstream>
#include <iostream>

void printFirst(char* data, size_t count) {
  std::string first(data, count);
  std::cout << first << std::endl;
}

void printLast(char* data, size_t count) {
  std::string last(data + strlen(data) - count, count);
  std::cout << last << std::endl;
}

int validateAndPerformAction(char* buffer, size_t size) {
  if (size < 2) {
    std::cerr << "Buffer is too short." << std::endl;
    return 1;
  }

  uint8_t action = buffer[0];
  uint8_t count = buffer[1];
  char* data = buffer + 2;

  if (!count) {
    std::cerr << "count must be non-zero." << std::endl;
    return 1;
  }

  // Forgot to check count vs. the length of data here, doh!

  if (!action) {
    std::cerr << "Action can't be zero." << std::endl;
    return 1;
  } else if (action >= 128) {
    printLast(data, count);
    return 0;
  } else {
    printFirst(data, count);
    return 0;
  }
}

int main(int argc, char** argv) {
  if (argc < 2) {
    std::cerr << "Usage is: " << argv[0] << " <file>" << std::endl;
    exit(1);
  }

  std::ifstream input(argv[1], std::ifstream::binary);
  if (!input) {
    std::cerr << "Error opening file." << std::endl;
    exit(1);
  }

  input.seekg(0, input.end);
  int size = input.tellg();
  input.seekg(0, input.beg);

  if (size < 0) {
    std::cerr << "Error seeking in file." << std::endl;
    exit(1);
  }

  char* buffer = new char[size];
  input.read(buffer, size);

  if (!input) {
    std::cerr << "Error while reading file." << std::endl;
    exit(1);
  }

  int ret = validateAndPerformAction(buffer, size);

  delete[] buffer;
  return ret;
}
This program looks way more elaborate compared to the last one, but don’t worry, it is not really doing a lot:
The code in the
main()function simply reads a file provided on the command line and puts its contents into a buffer that is passed tovalidateAndPerformAction().That
validateAndPerformAction()function pulls out two bytes of the buffer (actionandcount) and considers the restdata. Depending on the value ofaction, it then calls eitherprintFirst()orprintLast(), which prints either the first or the lastcountbytes ofdata.
If this sounds pointless, that is because it is. The whole idea of this program is that the security check (that count is not larger than the length of data) is missing in validateAndPerformAction() but that the illegal access happens later in either of the two print functions. Hence, we would expect this program to generate at least two (slightly) different crash signatures - one with printFirst() and one with printLast().
Let’s try it out with very simple fuzzing based on the last Python script.
# ignore
import os
import random
import subprocess
import tempfile
import sys
Since FuzzManager can have trouble with 8-bit characters in the input, we introduce an escapelines() function that converts text to printable ASCII characters.
Excursion: escapelines() implementatipn#
def isascii(s):
    return all([0 <= ord(c) <= 127 for c in s])
isascii('Hello,')
True
def escapelines(bytes):
    def ascii_chr(byte):
        if 0 <= byte <= 127:
            return chr(byte)
        return r"\x%02x" % byte

    def unicode_escape(line):
        ret = "".join(map(ascii_chr, line))
        assert isascii(ret)
        return ret

    return [unicode_escape(line) for line in bytes.splitlines()]
escapelines(b"Hello,\nworld!")
['Hello,', 'world!']
escapelines(b"abc\xffABC")
['abc\\xffABC']
End of Excursion#
Now to the actual script. As above, we set up a collector that collects and sends crash info whenever a crash occurs.
cmd = ["simply-buggy/out-of-bounds"]

# Connect to crash server
collector = Collector()

random.seed(2048)

crash_count = 0
TRIALS = 20

for itnum in range(0, TRIALS):
    rand_len = random.randint(1, 1024)
    rand_data = bytes([random.randrange(0, 256) for i in range(rand_len)])

    (fd, current_file) = tempfile.mkstemp(prefix="fuzztest", text=True)
    os.write(fd, rand_data)
    os.close(fd)

    current_cmd = []
    current_cmd.extend(cmd)
    current_cmd.append(current_file)

    result = subprocess.run(current_cmd,
                            stdout=subprocess.PIPE,
                            stderr=subprocess.PIPE)
    stdout = []   # escapelines(result.stdout)
    stderr = escapelines(result.stderr)
    crashed = False

    for line in stderr:
        if "ERROR: AddressSanitizer" in line:
            crashed = True
            break

    print(itnum, end=" ")

    if crashed:
        sys.stdout.write("(Crash) ")

        # This reads the simple-crash.fuzzmanagerconf file
        configuration = ProgramConfiguration.fromBinary(cmd[0])

        # This reads and parses our ASan trace into a more generic format,
        # returning us a generic "CrashInfo" object that we can inspect
        # and/or submit to the server.
        crashInfo = CrashInfo.fromRawCrashData(stdout, stderr, configuration)

        # Submit the crash
        collector.submit(crashInfo, testCase = current_file)

        crash_count += 1

    os.remove(current_file)

print("")
print("Done, submitted %d crashes after %d runs." % (crash_count, TRIALS))
0 (Crash) 1 2 (Crash) 3 4 5 6 7 8 (Crash) 9 10 11 12 (Crash) 13 14 (Crash) 15 16 17 18 19
Done, submitted 5 crashes after 20 runs.
If you run this script, you will see its progress and notice that it produces quite a few crashes. And indeed, if you visit the FuzzManager crashes page, you will notice a variety of crashes that have accumulated:
# ignore
gui_driver.get(fuzzmanager_url + "/crashmanager/crashes")
# ignore
Image(gui_driver.get_screenshot_as_png())
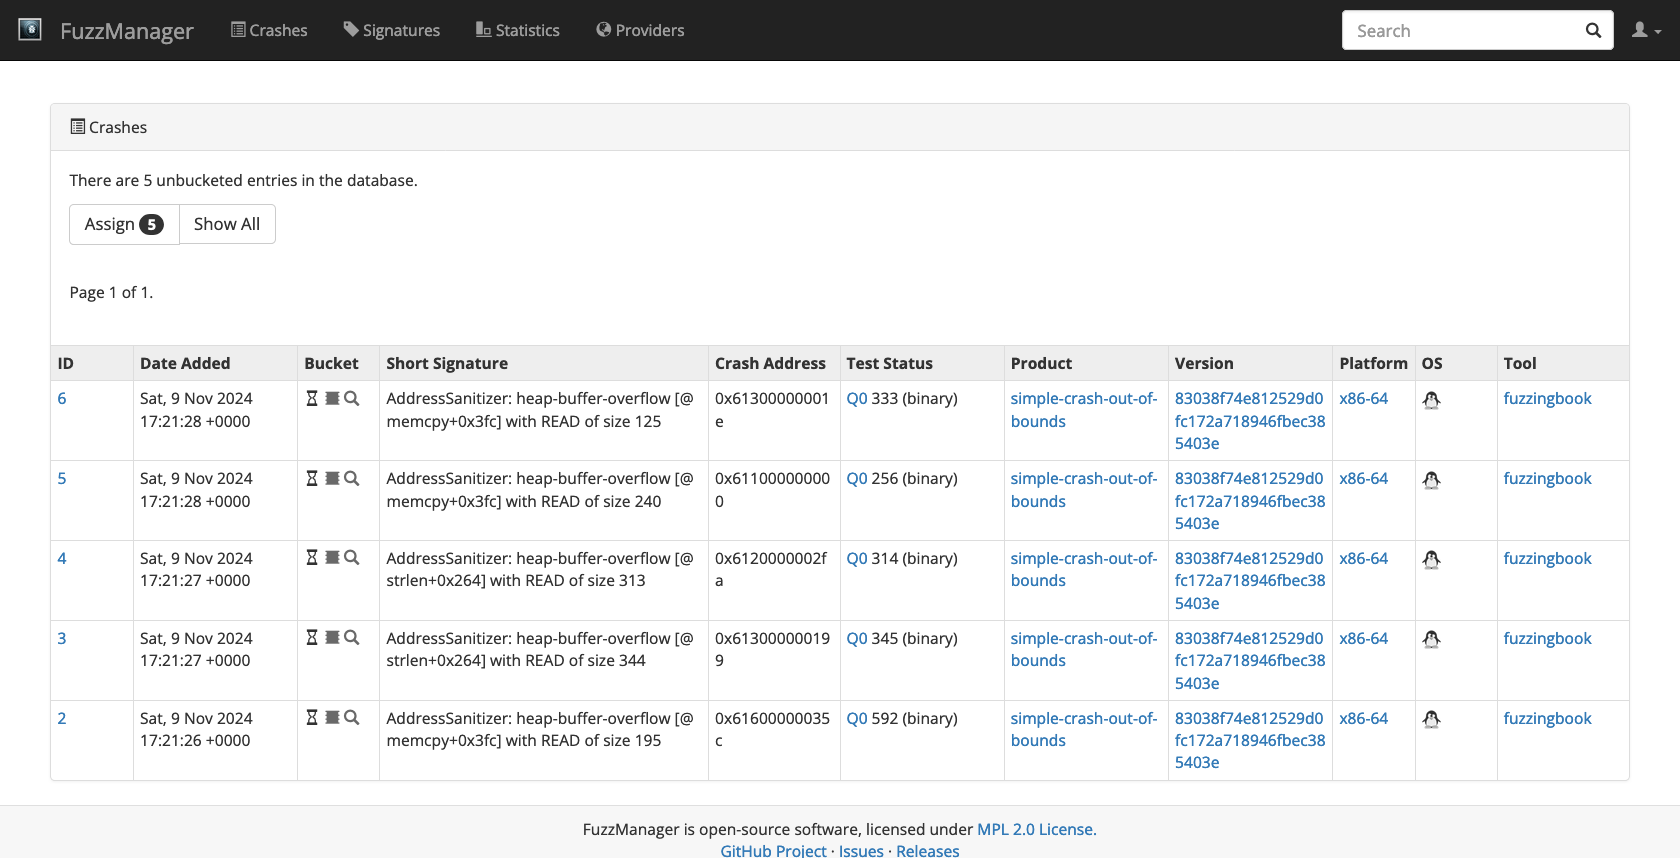
Pick the first crash and create a bucket for it, like you did the last time. After saving, you will notice that not all of your crashes went into the bucket. The reason is that our program created several different stacks that are somewhat similar but not exactly identical. This is a common problem when fuzzing real world applications.
Fortunately, there is an easy way to deal with this. While on the bucket page, hit the Optimize button for the bucket. FuzzManager will then automatically propose you to change your signature. Accept the change by hitting Edit with Changes and then Save. Repeat these steps until all crashes are part of the bucket. After 3 to 4 iterations, your signature will likely look like this:
{
  "symptoms": [
    {
      "type": "output",
      "src": "stderr",
      "value": "/ERROR: AddressSanitizer: heap-buffer-overflow/"
    },
    {
      "type": "stackFrames",
      "functionNames": [
        "?",
        "?",
        "?",
        "validateAndPerformAction",
        "main",
        "__libc_start_main",
        "_start"
      ]
    },
    {
      "type": "crashAddress",
      "address": "> 0xFF"
    }
  ]
}
As you can see in the stackFrames signature symptom, the validateAndPerformAction function is still present in the stack frame, because this function is common across all stack traces in all crashes; in fact, this is where the bug lives. But the lower stack parts have been generalized into arbitrary functions (?) because they vary across the set of submitted crashes.
The Optimize function is designed to automate this process as much as possible: It attempts to broaden the signature by fitting it to untriaged crashes and then checks if the modified signature would touch other existing buckets. This works with the assumption that other buckets are indeed other bugs, i.e. if you had created two buckets from your crashes first, optimizing would not work anymore. Also, if the existing bucket data is sparse, and you have a lot of untriaged crashes, the algorithm could propose changes that include crashes of different bugs in the same bucket. There is no way to fully automatically detect and prevent this, hence the process is semi-automated and requires you to review all proposed changes.
Collecting Code Coverage#
In the chapter on coverage, we have seen how measuring code coverage can be beneficial to assess fuzzer performance. Holes in code coverage can reveal particularly hard-to-reach locations as well as bugs in the fuzzer itself. Because this is an important part of the overall fuzzing operations, FuzzManager supports visualizing per-fuzzing code coverage of repositories – that is, we can interactively inspect which code was covered during fuzzing, and which was not.
To illustrate coverage collection and visualization in FuzzManager, we take a look at a another simple C++ program, the maze.cpp example:
# ignore
print_file("simply-buggy/maze.cpp")
/*
 * maze - A simple constant maze that crashes at some point.
 *
 * WARNING: This program neither makes sense nor should you code like it is
 *          done in this program. It is purely for demo purposes and uses
 *          bad and meaningless coding habits on purpose.
 */

#include <cstdlib>
#include <iostream>

int boom() {
  int* p = (int*)0x1;
  *p = 0xDEADBEEF;
  return *p;
}

int main(int argc, char** argv) {
  if (argc != 5) {
    std::cerr << "All I'm asking for is four numbers..." << std::endl;
    return 1;
  }

  int num1 = atoi(argv[1]);
  if (num1 > 0) {
    int num2 = atoi(argv[2]);
    if (num1 > 2040109464) {
      if (num2 < 0) {
        std::cerr << "You found secret 1" << std::endl;
        return 0;
      }
    } else {
      if ((unsigned int)num2 == 3735928559) {
        unsigned int num3 = atoi(argv[3]);
        if (num3 == 3405695742) {
          int num4 = atoi(argv[4]);
          if (num4 == 1111638594) {
            std::cerr << "You found secret 2" << std::endl;
            boom();
            return 0;
          }
        }
      }
    }
  }

  return 0;
}
As you can see, all this program does is read some numbers from the command line, compare them to some magical constants and arbitrary criteria, and if everything works out, you reach one of the two secrets in the program. Reaching one of these secrets also triggers a failure.
Before we start to work on this program, we recompile the programs with coverage support. In order to emit code coverage with either Clang or GCC, programs typically need to be built and linked with special CFLAGS like --coverage. In our case, the Makefile does this for us:
!(cd simply-buggy && make clean && make coverage)
rm -f ./maze ./out-of-bounds ./simple-crash
clang++ -fsanitize=address -g --coverage -o maze maze.cpp
clang++ -fsanitize=address -g --coverage -o out-of-bounds out-of-bounds.cpp
clang++ -fsanitize=address -g --coverage -o simple-crash simple-crash.cpp
Also, if we want to use FuzzManager to look at our code, we need to do the initial repository setup (essentially giving the server its own working copy of our git repository to pull the source from). Normally, the client and server run on different machines, so this involves checking out the repository on the server and telling it where to find it (and what version control system it uses):
!git clone https://github.com/uds-se/simply-buggy simply-buggy-server
Cloning into 'simply-buggy-server'...
remote: Enumerating objects: 22, done.
remote: Total 22 (delta 0), reused 0 (delta 0), pack-reused 22 (from 1)
Receiving objects: 100% (22/22), 4.90 KiB | 4.90 MiB/s, done.
Resolving deltas: 100% (9/9), done.
!cd FuzzManager; {sys.executable} server/manage.py setup_repository simply-buggy GITSourceCodeProvider ../simply-buggy-server
Successfully created repository 'simply-buggy' with provider 'GITSourceCodeProvider' located at ../simply-buggy-server
We now assume that we know some magic constants (like in practice, we sometimes know some things about the target, but might miss a detail) and we fuzz the program with that:
import random
import subprocess
random.seed(0)
cmd = ["simply-buggy/maze"]

constants = [3735928559, 1111638594]

TRIALS = 1000

for itnum in range(0, TRIALS):
    current_cmd = []
    current_cmd.extend(cmd)

    for _ in range(0, 4):
        if random.randint(0, 9) < 3:
            current_cmd.append(str(constants[
                random.randint(0, len(constants) - 1)]))
        else:
            current_cmd.append(str(random.randint(-2147483647, 2147483647)))

    result = subprocess.run(current_cmd, stderr=subprocess.PIPE)
    stderr = result.stderr.decode().splitlines()
    crashed = False

    if stderr and "secret" in stderr[0]:
        print(stderr[0])

    for line in stderr:
        if "ERROR: AddressSanitizer" in line:
            crashed = True
            break

    if crashed:
        print("Found the bug!")
        break

print("Done!")
You found secret 1
You found secret 1
You found secret 1
You found secret 1
You found secret 1
Done!
As you can see, with 1000 runs we found secret 1 a few times, but secret 2 (and the crash) are still missing. In order to determine how to improve this, we are now going to look at the coverage data.
We use Mozilla’s grcov tool to capture graphical coverage information.
# ignore
# !brew install rust
# !cargo install grcov
!export PATH=$HOME/.cargo/bin:$PATH; grcov simply-buggy/ -t coveralls+ --commit-sha $(cd simply-buggy && git rev-parse HEAD) --token NONE -p `pwd`/simply-buggy/ > coverage.json
!cd FuzzManager; {sys.executable} -mCovReporter --repository simply-buggy --description "Test1" --submit ../coverage.json
We can now go to the FuzzManager coverage page to take a look at our source code and its coverage.
# ignore
gui_driver.get(fuzzmanager_url + "/covmanager")
# ignore
Image(gui_driver.get_screenshot_as_png())
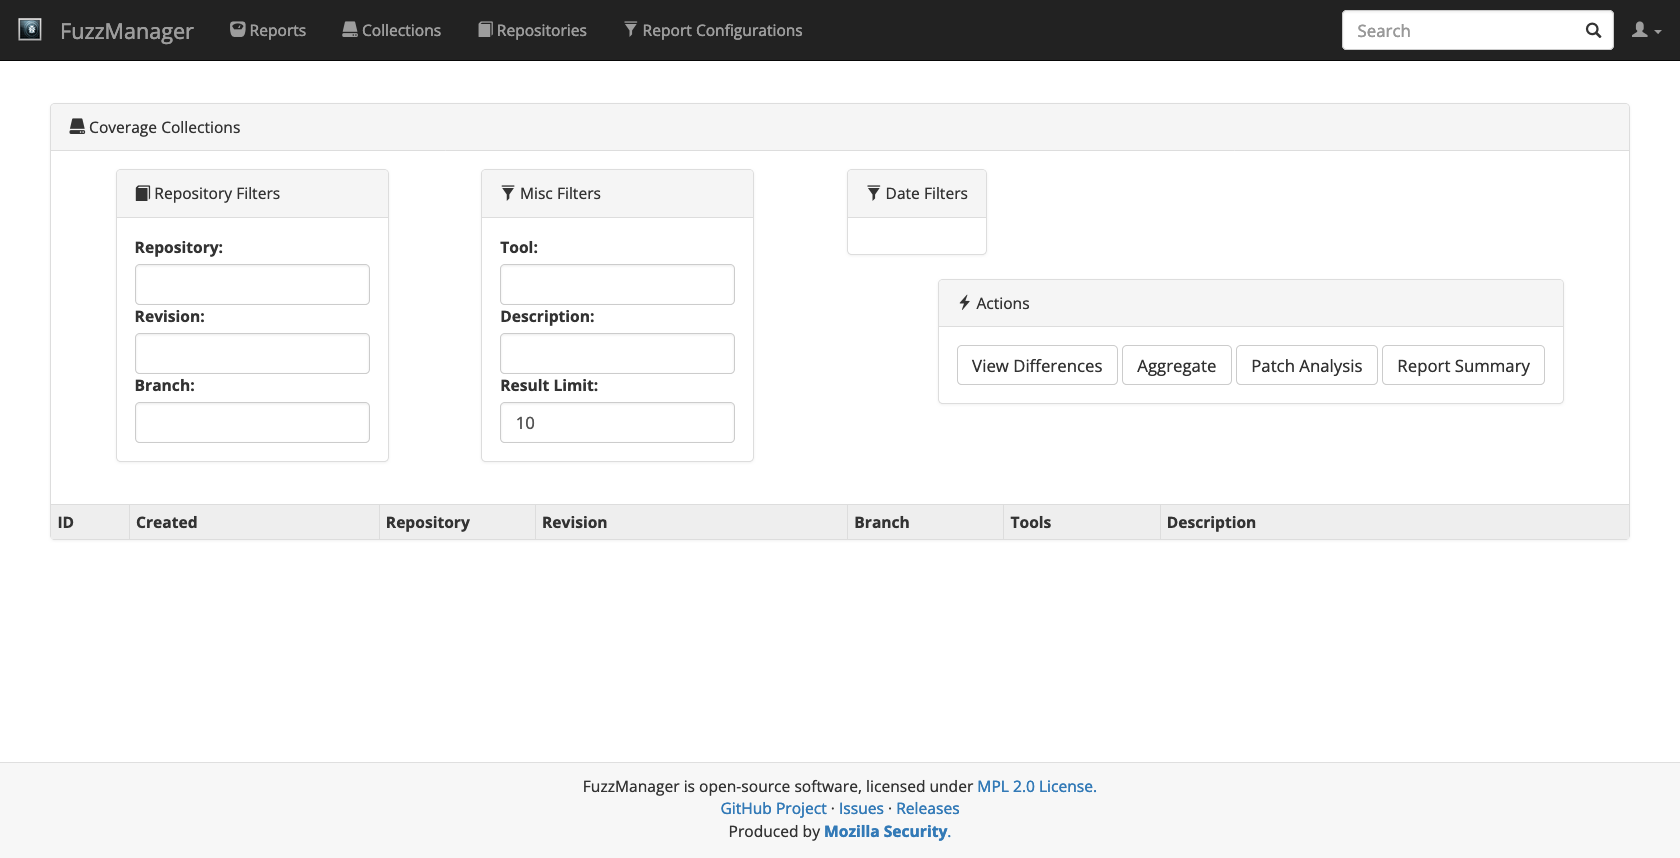
Click on the first ID to browse the coverage data that you just submitted.
# ignore
first_id = gui_driver.find_element(By.XPATH, '//td/a[contains(@href,"/browse")]')
first_id.click()
time.sleep(DELAY_AFTER_CLICK)
# ignore
Image(gui_driver.get_screenshot_as_png())
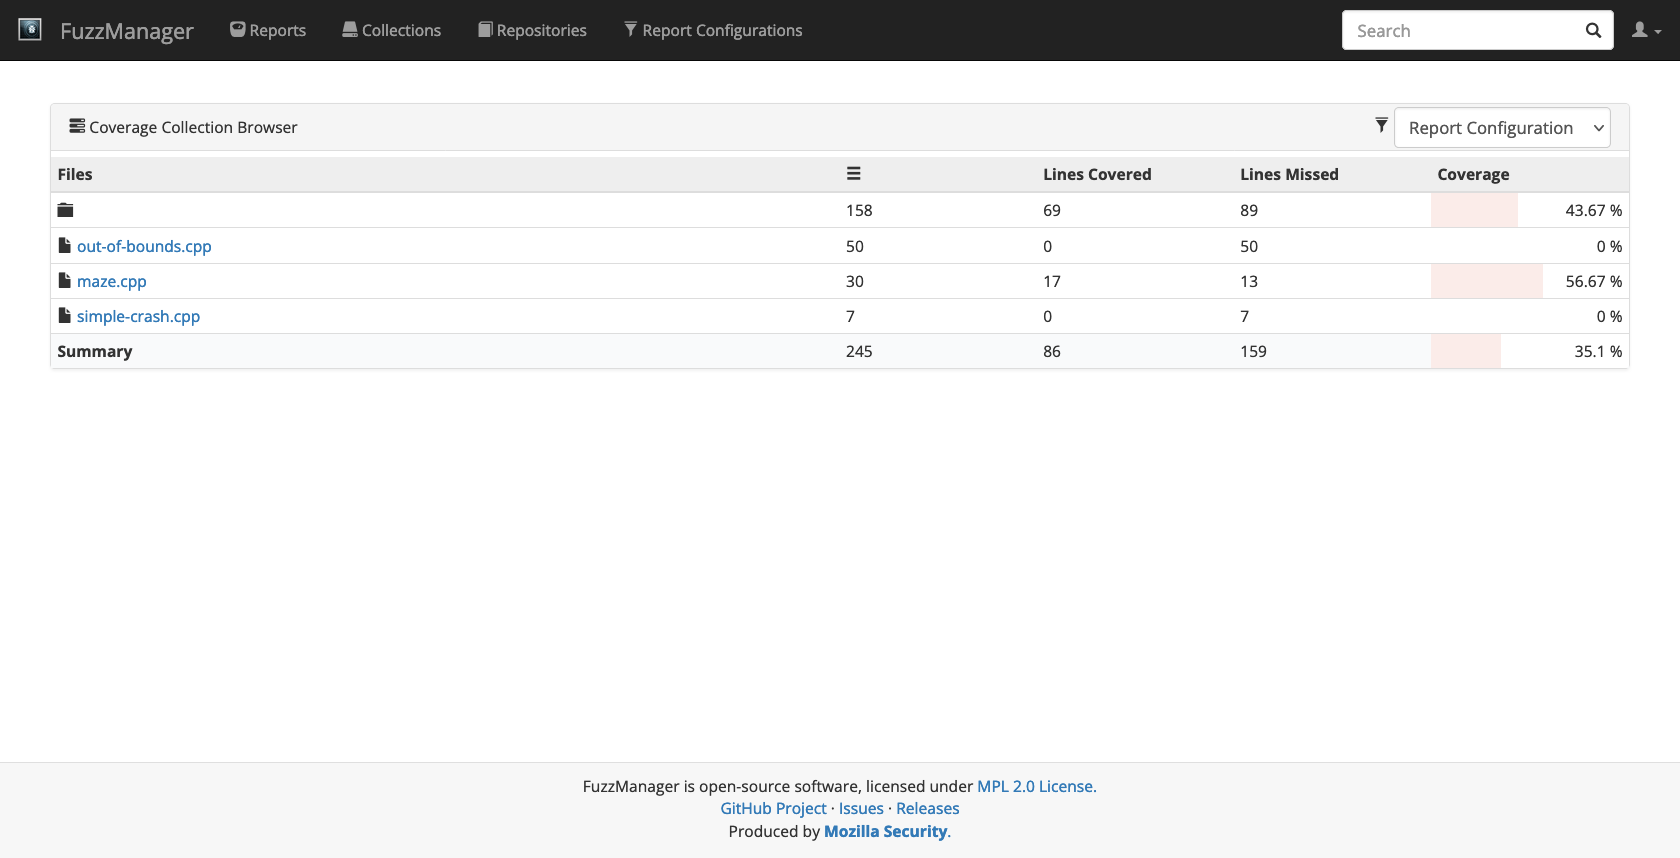
You will first see the full list of files in the simply-buggy repository, with all but the maze.cpp file showing 0% coverage (because we didn’t do anything with these binaries since we rebuilt them with coverage support). Now click on maze.cpp and inspect the coverage line by line:
# ignore
maze_cpp = gui_driver.find_element(By.XPATH, "//*[contains(text(), 'maze.cpp')]")
maze_cpp.click()
time.sleep(DELAY_AFTER_CLICK)
# ignore
gui_driver.set_window_size(1400, 1400)
Image(gui_driver.get_screenshot_as_png())
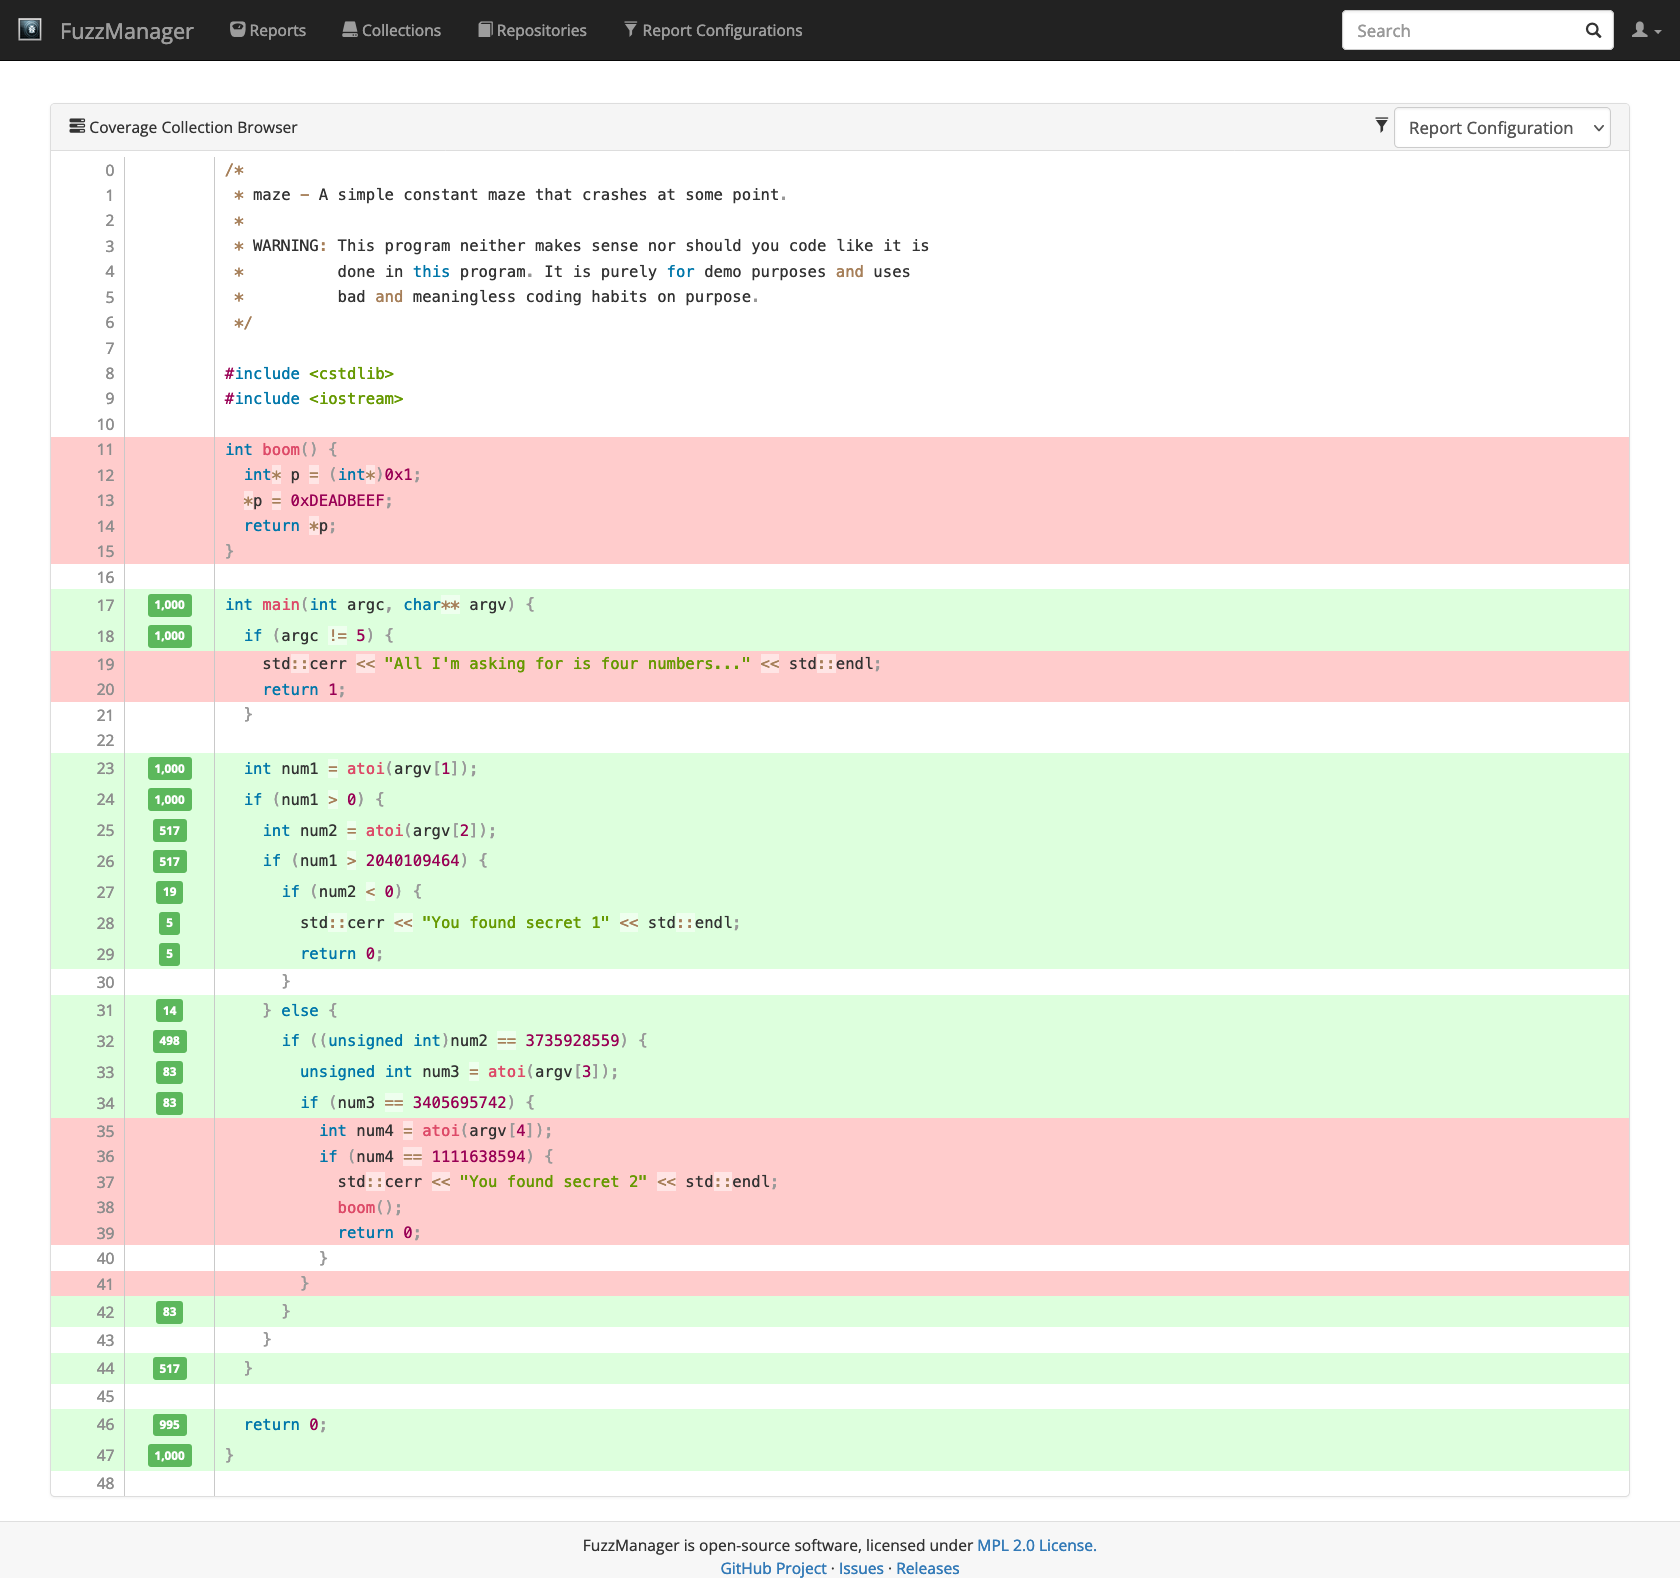
Lines highlighted in green have been executed; the number in the green bar on the left tells how many times. Lines highlighted in red have not been executed. There are two observations to make:
The if-statement in Line 34 is still covered, but the lines following after it are red. This is because our fuzzer misses the constant checked in that statement, so it is fairly obvious that we need to add to our constants list.
From Line 26 to Line 27 there is a sudden drop in coverage. Both lines are covered, but the counters show that we fail that check in more than 95% of the cases. This explains why we find secret 1 so rarely. If this was a real program, we would now try to figure out how much additional code is behind that branch and adjust probabilities such that we hit it more often, if necessary.
Of course, the maze program is so small that one could see these issues with the bare eye. But in reality, with complex programs, it seldom obvious where a fuzzing tool gets stuck. Identifying these cases can greatly help to improve fuzzing results.
For the sake of completeness, let’s rerun the program now with the missing constant added:
random.seed(0)
cmd = ["simply-buggy/maze"]

# Added the missing constant here
constants = [3735928559, 1111638594, 3405695742]

for itnum in range(0,1000):
    current_cmd = []
    current_cmd.extend(cmd)

    for _ in range(0,4):
        if random.randint(0, 9) < 3:
            current_cmd.append(str(
                constants[random.randint(0, len(constants) - 1)]))
        else:
            current_cmd.append(str(random.randint(-2147483647, 2147483647)))

    result = subprocess.run(current_cmd, stderr=subprocess.PIPE)
    stderr = result.stderr.decode().splitlines()
    crashed = False

    if stderr:
        print(stderr[0])

    for line in stderr:
        if "ERROR: AddressSanitizer" in line:
            crashed = True
            break

    if crashed:
        print("Found the bug!")
        break

print("Done!")
You found secret 1
You found secret 2
Found the bug!
Done!
As expected, we now found secret 2 including our crash.
Synopsis#
The Python FuzzManager package allows for programmatic submission of failures from a large number of (fuzzed) programs. One can query crashes and their details, collect them into buckets to ensure they will be treated the same, and also retrieve coverage information for debugging both programs and their tests.
Lessons Learned#
When fuzzing (a) with several machines, (b) several programs, © with several fuzzers, use a crash server such as FuzzManager to collect and store crashes.
Crashes likely to be caused by the same failure should be collected in buckets to ensure they all can be treated the same.
Centrally collecting fuzzer coverage can help reveal issues with fuzzers.
# ignore
# We're done, so we clean up
fuzzmanager_process.terminate()
# ignore
gui_driver.quit()
# ignore
import shutil
# ignore
for temp_file in ['coverage.json', 'geckodriver.log', 'ghostdriver.log']:
    if os.path.exists(temp_file):
        os.remove(temp_file)
# ignore
home = os.path.expanduser("~")
for temp_dir in ['coverage', 'simply-buggy', 'simply-buggy-server',
                 'simply-buggy-server',
                 'FuzzManager']:
    if os.path.exists(temp_dir):
        shutil.rmtree(temp_dir)
Next Steps#
In the next chapter, we will learn how to
Background#
This chapter builds on the implementation of FuzzManager. Its GitHub page contains plenty of additional information on how to use it.
The blog article “Browser Fuzzing at Mozilla” discusses the context of how FuzzManager is used at Mozilla for massive browser testing.
The paper “What makes a good bug report?” \cite{Bettenburg2008} lists essential information that developers expect from a bug report, how they use this information, and for which purposes.
Exercises#
Exercise 1: Automatic Crash Reporting#
Create a Python function that can be invoked at the beginning of a program to have it automatically report crashes and exceptions to a FuzzManager server. Have it track program name (and if possible, outputs) automatically; crashes (exceptions raised) should be converted into ASan format such that FuzzManager can read them.
Solution. To be added.

